Free Preparation Discussions
Cisco 200-301 Exam
- Topic 1: Network Fundamentals: The topic explains the role and function of network components. It also discusses specifications of network topology architectures. Moreover, it Configure and verify IPv4 addressing and subnetting and IPv6 addressing and prefix. You also encounter questions about explaining virtualization fundamentals and describing switching concepts. Lastly, it compares physical interface and cabling types and TCP to UDP.
- Topic 2: Network Access: In this topic questions about configuring and verifying VLANs, interswitch connectivity, Layer 2 discovery protocols, and Layer 2/Layer 3. It also describes Cisco Wireless Architectures and AP modes, physical infrastructure connections of WLAN components, AP and WLC management access connections.
- Topic 3: Connectivity: The topic connectivity discusses configuring and verifying IPv4 and IPv6 static routing, and single area OSPFv2. It also determines how a router makes a forwarding decision by default and describes the purpose, functions, and concepts of first hop redundancy protocols.
- Topic 4: IP Services: It explains the forwarding per-hop behavior (PHB) for QoS, role of DHCP and DNS within the network, and function of SNMP in network operations. Moreover, it discusses configuring and verifying NTP operating in a client and server mode, inside source NAT using static and pools, DHCP client and relay. Lastly, the topic focuses on capabilities and functions of TFTP/FTP in the network and the use of syslog features.
- Topic 5: Security Fundamentals: The topic defines key security concepts, security program elements, and wireless security protocols. Moreover, it focuses on configuring and verifying device access control, Layer 2 security features, and WLAN within the GUI.
- Topic 6: Automation and Programmability: In this topic questions about explaining how automation impacts network management, comparing traditional networks with controller-based networking and describing characteristics of REST-based APIs. It also delves into components of JSON-encoded data, capabilities of configuration management mechanisms Puppet, traditional campus device management with Cisco DNA Center enabled device management, and controller-based, software defined architecture.
Free Cisco 200-301 Exam Actual Questions
The questions for 200-301 were last updated On Apr. 27, 2024
All physical cabling is in place. A company plans to deploy 32 new sites.
The sites will utilize both IPv4 and IPv6 networks.
1 . Subnet 172.25.0.0/16 to meet the subnet requirements and maximize
the number of hosts
Using the second subnet
* Assign the first usable IP address to e0/0 on Sw1O1
* Assign the last usable IP address to e0/0 on Sw102
2. Subnet to meet the subnet requirements and maximize
the number of hosts
c Using the second subnet
* Assign an IPv6 GUA using a unique 64-Bit interface identifier
on e0/0 on Sw101
* Assign an IPv6 GUA using a unique 64-Bit interface identifier
on eO/O on swi02
Guidelines
This is a lab item in which tasks will be performed on virtual devices.
* Refer to the Tasks tab to view the tasks for this lab item.
* Refer to the Topology tab to access the device console(s) and perform the tasks.
* Console access is available for all required devices by clicking the device icon or using
the tab(s) above the console window.
* All necessary preconfigurations have been applied.
* Do not change the enable password or hostname for any device.
* Save your configurations to NVRAM before moving to the next item.
* Click Next at the bottom of the screen to submit this lab and move to the next question.
* When Next is clicked, the lab closes and cannot be reopened.
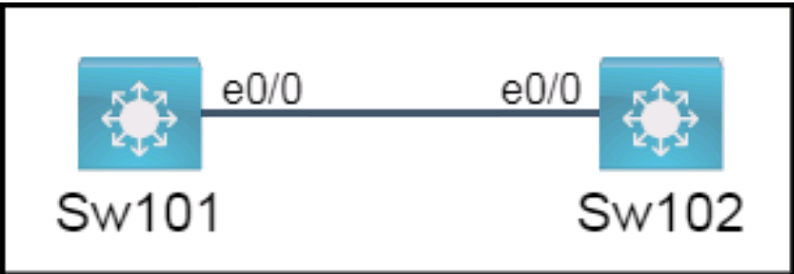
To subnet 172.25.0.0/16 to meet the subnet requirements and maximize the number of hosts, you need to determine how many bits you need to borrow from the host portion of the address to create enough subnets for 32 sites. Since 32 is 2^5, you need to borrow 5 bits, which means your new subnet mask will be /21 or 255.255.248.0. To find the second subnet, you need to add the value of the fifth bit (32) to the third octet of the network address (0), which gives you 172.25.32.0/21 as the second subnet. The first usable IP address in this subnet is 172.25.32.1, and the last usable IP address is 172.25.39.254.
To assign the first usable IP address to e0/0 on Sw101, you need to enter the following commands on the device console:
Sw101#configure terminal Sw101(config)#interface e0/0 Sw101(config-if)#ip address 172.25.32.1 255.255.248.0 Sw101(config-if)#no shutdown Sw101(config-if)#end
To assign the last usable IP address to e0/0 on Sw102, you need to enter the following commands on the device console:
Sw102#configure terminal Sw102(config)#interface e0/0 Sw102(config-if)#ip address 172.25.39.254 255.255.248.0 Sw102(config-if)#no shutdown Sw102(config-if)#end
To subnet an IPv6 GUA to meet the subnet requirements and maximize the number of hosts, you need to determine how many bits you need to borrow from the interface identifier portion of the address to create enough subnets for 32 sites. Since 32 is 2^5, you need to borrow 5 bits, which means your new prefix length will be /69 or ffff:ffff:ffff:fff8::/69 (assuming that your IPv6 GUA has a /64 prefix by default). To find the second subnet, you need to add the value of the fifth bit (32) to the fourth hextet of the network address (0000), which gives you xxxx:xxxx:xxxx:0020::/69 as the second subnet (where xxxx:xxxx:xxxx is your IPv6 GUA prefix). The first and last IPv6 addresses in this subnet are xxxx:xxxx:xxxx:0020::1 and xxxx:xxxx:xxxx:0027:ffff:ffff:ffff:fffe respectively.
To assign an IPv6 GUA using a unique 64-bit interface identifier on e0/0 on Sw101, you need to enter the following commands on the device console (assuming that your IPv6 GUA prefix is 2001:db8::/64):
Sw101#configure terminal Sw101(config)#interface e0/0 Sw101(config-if)#ipv6 address 2001:db8::20::1/69 Sw101(config-if)#no shutdown Sw101(config-if)#end
To assign an IPv6 GUA using a unique 64-bit interface identifier on e0/0 on Sw102, you need to enter the following commands on the device console (assuming that your IPv6 GUA prefix is 2001:db8::/64):
Sw102#configure terminal Sw102(config)#interface e0/0 Sw102(config-if)#ipv6 address 2001:db8::27::fffe/69 Sw102(config-if)#no shutdown Sw102(config-if)#end
All physical cabling is in place. Router R4 and PCI are fully configured and
inaccessible. R4's WAN interfaces use .4 in the last octet for each subnet.
Configurations should ensure that connectivity is established end-to-end.
1 . Configure static routing to ensure RI prefers the path through R2 to
reach only PCI on R4's LAN
2. Configure static routing that ensures traffic sourced from RI will take
an alternate path through R3 to PCI in the event of an outage along
the primary path
3. Configure default routes on RI and R3 to the Internet using the least number of hops
Guidelines
This is a lab item in which tasks will be performed on virtual devices.
* Refer to the Tasks tab to view the tasks for this lab item.
* Refer to the Topology tab to access the device console(s) and perform the tasks.
* Console access is available for all required devices by clicking the device icon or using
the tab(s) above the console window.
* All necessary preconfigurations have been applied.
* Do not change the enable password or hostname for any device.
* Save your configurations to NVRAM before moving to the next item.
* Click Next at the bottom of the screen to submit this lab and move to the next question.
* When Next is clicked, the lab closes and cannot be reopened.

To configure static routing on R1 to ensure that it prefers the path through R2 to reach only PC1 on R4's LAN, you need to create a static route for the host 10.0.0.100/8 with a next-hop address of 20.0.0.2, which is the IP address of R2's interface connected to R1. You also need to assign a lower administrative distance (AD) to this route than the default AD of 1 for static routes, so that it has a higher preference over other possible routes. For example, you can use an AD of 10 for this route. To create this static route, you need to enter the following commands on R1's console:
R1#configure terminal R1(config)#ip route 10.0.0.100 255.0.0.0 20.0.0.2 10 R1(config)#end
To configure static routing on R1 that ensures that traffic sourced from R1 will take an alternate path through R3 to PC1 in the event of an outage along the primary path, you need to create another static route for the host 10.0.0.100/8 with a next-hop address of 40.0.0.2, which is the IP address of R3's interface connected to R1. You also need to assign a higher AD to this route than the AD of the primary route, so that it has a lower preference and acts as a backup route. For example, you can use an AD of 20 for this route. This type of static route is also known as a floating static route. To create this static route, you need to enter the following commands on R1's console:
R1#configure terminal R1(config)#ip route 10.0.0.100 255.0.0.0 40.0.0.2 20 R1(config)#end
To configure default routes on R1 and R3 to the Internet using the least number of hops, you need to create a static route for the network 0.0.0.0/0 with a next-hop address of the ISP's interface connected to each router respectively. A default route is a special type of static route that matches any destination address and is used when no other specific route is available. The ISP's interface connected to R1 has an IP address of 10.0.0.4, and the ISP's interface connected to R3 has an IP address of 50.0.0.4. To create these default routes, you need to enter the following commands on each router's console:
On R1: R1#configure terminal R1(config)#ip route 0.0.0.0 0.0.0.0 10.0.0.4 R1(config)#end
On R3: R3#configure terminal R3(config)#ip route 0.0.0.0 0.0.0.0 50.0.0.4 R3(config)#end
Refer to the exhibit.

What is represented beginning with line 1 and ending with line 5?
All physical cabling is in place. Router R4 and PCI are fully configured and
inaccessible. R4's WAN interfaces use .4 in the last octet for each subnet.
Configurations should ensure that connectivity is established end-to-end.
1 . Configure static routing to ensure RI prefers the path through R2 to
reach only PCI on R4's LAN
2. Configure static routing that ensures traffic sourced from RI will take
an alternate path through R3 to PCI in the event of an outage along
the primary path
3. Configure default routes on RI and R3 to the Internet using the least number of hops
Guidelines
This is a lab item in which tasks will be performed on virtual devices.
* Refer to the Tasks tab to view the tasks for this lab item.
* Refer to the Topology tab to access the device console(s) and perform the tasks.
* Console access is available for all required devices by clicking the device icon or using
the tab(s) above the console window.
* All necessary preconfigurations have been applied.
* Do not change the enable password or hostname for any device.
* Save your configurations to NVRAM before moving to the next item.
* Click Next at the bottom of the screen to submit this lab and move to the next question.
* When Next is clicked, the lab closes and cannot be reopened.
To configure static routing on R1 to ensure that it prefers the path through R2 to reach only PC1 on R4's LAN, you need to create a static route for the host 10.0.0.100/8 with a next-hop address of 20.0.0.2, which is the IP address of R2's interface connected to R1. You also need to assign a lower administrative distance (AD) to this route than the default AD of 1 for static routes, so that it has a higher preference over other possible routes. For example, you can use an AD of 10 for this route. To create this static route, you need to enter the following commands on R1's console:
R1#configure terminal R1(config)#ip route 10.0.0.100 255.0.0.0 20.0.0.2 10 R1(config)#end
To configure static routing on R1 that ensures that traffic sourced from R1 will take an alternate path through R3 to PC1 in the event of an outage along the primary path, you need to create another static route for the host 10.0.0.100/8 with a next-hop address of 40.0.0.2, which is the IP address of R3's interface connected to R1. You also need to assign a higher AD to this route than the AD of the primary route, so that it has a lower preference and acts as a backup route. For example, you can use an AD of 20 for this route. This type of static route is also known as a floating static route. To create this static route, you need to enter the following commands on R1's console:
R1#configure terminal R1(config)#ip route 10.0.0.100 255.0.0.0 40.0.0.2 20 R1(config)#end
To configure default routes on R1 and R3 to the Internet using the least number of hops, you need to create a static route for the network 0.0.0.0/0 with a next-hop address of the ISP's interface connected to each router respectively. A default route is a special type of static route that matches any destination address and is used when no other specific route is available. The ISP's interface connected to R1 has an IP address of 10.0.0.4, and the ISP's interface connected to R3 has an IP address of 50.0.0.4. To create these default routes, you need to enter the following commands on each router's console:
On R1: R1#configure terminal R1(config)#ip route 0.0.0.0 0.0.0.0 10.0.0.4 R1(config)#end
On R3: R3#configure terminal R3(config)#ip route 0.0.0.0 0.0.0.0 50.0.0.4 R3(config)#end
Refer to the exibit.


IP connectivity and OSPF are preconfigured on all devices where necessary. Do not make any changes to the IP addressing or OSPF. The company policy uses connected interfaces and next hops when configuring static routes except for load balancing or redundancy without floating static. Connectivity must be established between subnet 172.20.20.128/25 on the Internet and the LAN at 192.168.0.0/24 connected to SW1:
1. Configure reachability to the switch SW1 LAN subnet in router R2.
2. Configure default reachability to the Internet subnet in router R1.
3. Configure a single static route in router R2 to reach to the Internet subnet considering both redundant links between routers R1 and R2. A default route is NOT allowed in router R2.
4. Configure a static route in router R1 toward the switch SW1 LAN subnet where the primary link must be through Ethernet0/1. and the backup link must be through Ethernet0/2 using a floating route. Use the minimal administrative distance value when required.
Answer as below configuration:
On R2:
Enable
Conf t
Ip route 192.168.1.0 255.255.255.0 10.10.31.1
On R1:
Enable
Conf t
Ip route 0.0.0.0 0.0.0.0 10.10.13.3
On R2
Ip route 172.20.20.128 255.255.255.128 e0/2
Ip route 172.20.20.128 255.255.255.128 e0/1
On R1
Ip route 192.168.0.0 255.255.255.0 e0/1
Ip route 192.168.0.0 255.255.255.0 10.10.12.2 3
Save all configurations after every router from anyone of these command
Do wr
Or
Copy run start
- Select Question Types you want
- Set your Desired Pass Percentage
- Allocate Time (Hours : Minutes)
- Create Multiple Practice tests with Limited Questions
- Customer Support
Currently there are no comments in this discussion, be the first to comment!